Macros
About these Macros
As a result of the Content Creation Tutorials that I have released it became obvious that while it is certainly possible to learn how to create models by following them there was still a large amount of effort needed to create anything, especially a loco. With a little experimentation I discovered that the GMax scripting language MAXScript is capable of automating the creation of just about anything.
Incidentally the GMax MAXScript language is a slightly cut-down version of that for 3DSMax so the macro should work in 3DSMax 4 onwards although I can't confirm this. I have heard that it works in 3DSMax V5 though.
Installing
Macro scripts are not installed in the usual way - they have to be added to a toolbar. To do this run the Macro's installer *.exe file (and perform a virus scan on the *.exe first, especially if you got the installer from somewhere other than this site) and install into the directory where 'GMax.exe' is to be found. Choose 'Customize -> Customize User Interface' on the top menu bar. In the 'Category' drop down list choose '44090 Tools' and you'll see the macros you've installed in the 'Actions' window.
Create a new toolbar by choosing 'New...' and giving the bar a name. You can then drag the macros from the 'Action' window to the new toolbar. Finally choose 'Customize -> Configure Paths' and make sure that the 'Scenes' directory is listed and that it points to the right place.
The installer assumes that the 'Scenes' directory is in the standard location, if you've set the 'Scenes' path to be somewhere else (as recommended in the GMax Bible for example) then you might be able to copy everything from where the installer put things to the right location but this is something I haven't tried. The Trainz GamePack also changes the paths, so if you are using that you'll certainly need to change the paths back to the standard location.
Licence
These macros and scripts may be freely copied and used for any purpose including the production of Payware models for any Railway Simulator. The scripts themselves, however, may not be offered for sale on their own or as part of a complilation without prior written permission from the Author, Paul Hobbs (paul.hobbs@web.de)
GMax: BogieBuilder v1.03
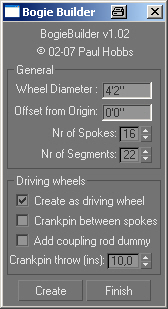
Simplifies the production of simple steam loco bogies for Auran's Trainz simulator, Connecting rods, outside cylinders and valve gear are not created - despite this you can use the macro to create the basic bogie with carrying and driving wheels plus coupling rods.
Note that a few people have had problems getting this macro to work, you must follow all of the instructions given above. It was also my first macro and it does not have much in the way of error checking and assumes that the bogie will be created in a certain way. In particular it expects you to start building with the frontmost driver and that you will work your way backwards (failure to do this will result in the connecting rods turning inside out). I'd also build all the drivers first followed by the carrying wheelsets. Don't break off and start doing something else in the middle of the macro in other words.
For one of the driver wheels sets you need to select 'Add coupling rod dummy'. If you forget to do this the coupling rods will not be animated.
GMax: SteamLib V1.07 (84 Objects)
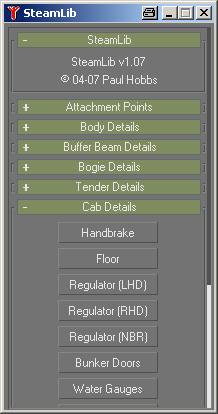
This macro is designed to simplify the building of steam locos by providing a library of standard parts that can be simply added to an existing model. It does not create a basic loco body, only parts such as buffers, couplers and handrail knobs. The list is not comprehensive!
A useful feature is that the insertion point of the object can be selected on the loco mesh avoiding the need to move the object afterwards as would be the case when merging GMax files. Also if a point is selected on the rear buffer beam for example the object will be turned through 180 degrees, in all cases the script attempts to position the object correctly assuming the model has been built in accordance with the Auran guidelines for Trainz models. Especially neat is the regulator cab control which is positioned, linked and animated under script control ready for exporting.
The macro prompts for what input it is expecting in the 'Listener' window which can be opened by pressing 'F11'. It's a good idea to have this open when trying the macro until you get the hang of how it works. Also a good idea is to select and open the ' 2d snap toggle' dialog (fourth icon to the left of the big 'Animate' button at the bottom of the screen). This enables the insertion point to snap to the pivot point or vertexes of meshes already in your model. This makes positioning the library objects much easier.
If you think that adding library assets to your model is a neat idea, it's worth pointing out that Blender from v3.0 on has much better possibilities, both built-in and through third party add-ons.